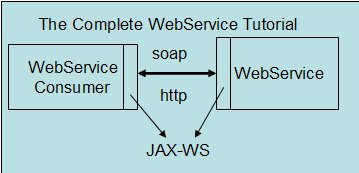
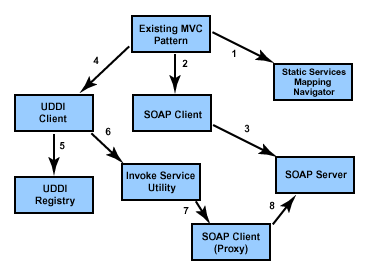
This article provides an architecture and sample application for using JMS as the transport for Web service invocations. Although the articles using AXIS framework , but overall architecture remains same for web service communication over JMS tutorial
This article assumes that you are familiar with the AXIS processing system. The software required for the examples is as follows:
- IBM WSDK (WebSphere SDK for Web Services).
- MQSeries 5.2 with JMS support pack ma88_win.zip.
- Sample code ws-jms.zip.
This article assumes that the above software is installed and configured.
Introduction to the Apache AXIS framework
The Axis framework is a Java-based, open source implementation of the latest SOAP specification, SOAP 1.2, and SOAP with Attachments specification from the Apache Group. The following are the key features of this AXIS framework:
- Flexible Messaging Framework: It provides a flexible messaging framework that includes handlers, chain, serializers, and deserializers. A handler is an object processing request, response, and fault flow. A handler can be grouped together into chains and the order of these handlers can be configured using a flexible deployment descriptor.
- Flexible Transport Framework: Axis provides a transport framework that helps you create your own pluggable transport senders and transport listeners. In this article you shall be building your own JMS Transport and listeners for sending and receiving SOAP messages.
- Data Encoding support: Axis provides automatic serialization of a wide variety of data types as per the XML Schema specifications and provides a facility to use your own customized Serializer and Deserializer.
- Additional Features: Axis provides full support for WSDL as well as Logging, Error, and Fault Handling mechanisms.
Overview of the AXIS architecture
The core components of the AXIS Architecture include:
- AxisEngine: This acts like a central controller for other components. It can be implemented on the server side as well as the client side.
- MessageContext: The MessageContext class ia a wrapper for SOAP requests and responses. It provides context information about a message to other components in the AXIS message-processing system.
- Handlers and Chains: Handlers are the basic building blocks in the AXIS system. A handler takes a MessageContext and performs actions and returns back to the calling code. A chain is a special handler that represents a sequence of other handlers.
- Transport: Provides transport for messages to get into the AXIS engine and the return of response messages to the client.
- Serializers and Deserializers: These are required for conversion of data from native format to XML and from XML back to native format.
- Deployment files: AXIS system defines an XML based deployment descriptor known as a Web Service Deployment Descriptor (WSDD) that defines configuration of the AXIS system on the server side as well as the client side.
Designing the JMS SOAP framework
JMS defines a standard way for Java applications to create and exchange messages via Message Oriented Middleware (MOM) . You will be using MQSeries as your MOM. You will be developing a Point to Point (P2P) message based system, which allows messages to be exchanged between the producer and the consumer through a channel called a queue. A queue is a destination to which a producer sends messages and from which the receiver takes messages. Each message is consumed by only one receiver in this model.
Figure 1 depicts the architectural overview of your JMS SOAP framework system using AXIS.
Figure 1. JMS SOAP Architecture
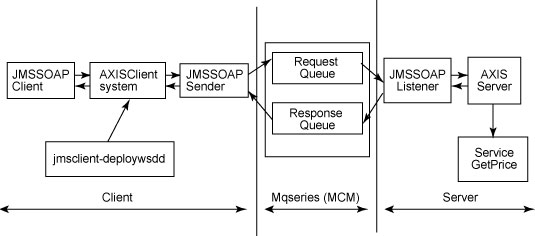
A striking feature of AXIS is that it allows the framework to configure on the server side as well as the client side for client message based processing. In this case you shall be configuring the Axis framework on the server as well as the client side using AXIS based deployment descriptors. The server side deployment descriptor will tell the AXIS server on the server side which Web service to invoke. The client side deployment descriptor will tell the AXIS server on the client side which transport handler to use for transportation of SOAP messages. You shall be building your own JMS Transport handler for transportation of SOAP messages.
The above framework can be demonstrated using the following steps:
- The JMSSOAP client constructs the org.apache.axis.client.Call object and sets the location, call parameters, service, method name and the transport mechanism (that is, JMSMqseries Transport). It then invokes the AXISClient.
- The AXISClient checks the transport object in the deployment descriptor (client-deploy.wsdd) and loads the transport handler(JMSSOAPHandler) deployed for JMSMqseries Transport.
- The JMSSOAPHandler receives the SOAP request wrapped in a MessageContext object and puts the SOAP request into RequestQueue.
- When the message arrives at RequestQueue, the JMSSOAPListener event onMessage() is fired which takes the SOAP request, and creates an instance of the AXISServer engine.
- The AXISServer engine then invokes the corresponding Web service and passes the request parameter to it.
- The AXISServer then receives the response from the Web service and places a SOAP response in the ResponseQueue.
- The JMSSOAPHandler gets notified when the SOAP message is placed in the ResponseQueue. It then receives the SOAP message from the ResponseQueue and returns control back to the JMSSOAP Client.
- The JMSSOAP client then receives the SOAP message, extracts the results and displays it at the console.
Building the application framework
Before you run the application, you need to set up Queue Manager and Queues, bind to JNDI for JMS communication, set up the AXIS framework in WSDK and deploy the server and client side AXIS based descriptors. Download the zip file containing the batch file for setting up the MQSeries queues and the source code and deployment descriptors for the application. Extract the zip file to your C: drive.
Setting up the queues
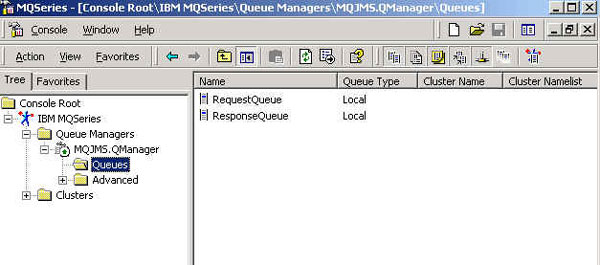
- Run the mqsetup.bat file provided in the C:\mqjms\batch folder. This batch file requires the bin folder of an MQSeries installation (such as C:\mqseries\bin) to be set in your environment path variable. After running the batch file, you should see a message “All valid MQSC commands were processed”. Open the MQSeries explorer using Start -> Programs -> IBM MQSeries -> MQSeriesExplorer to make sure that queue mangers and queues have been created. Figure 2 shows that a QueueManager “MQJMS.QManager” has been created and is running.
Figure 2. Queue manager configuration for MQSeries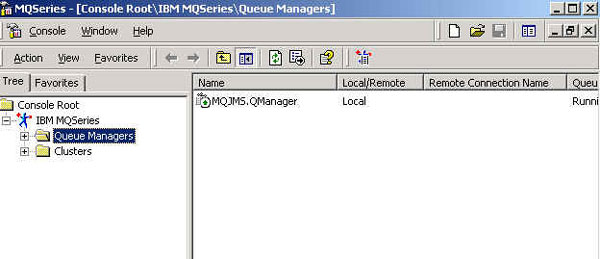
- Click on the “Queues” folder below “MQJMS.QManager” on the Left pane. You should see that two queues “RequestQueue” and “ResponseQueue” have been created as shown in Figure 3.Figure 3. Request/response queue configuration for MQSeries
This completes the setup of queues.
Setting up JMS and JNDI administration
In your application, the JNDI access makes use of the file-based FSContext version available from http://java.sun.com/products/jndi/index.html. The FSContext .jar file is also included in MQSeries JMS Support pack ma88_win.zip. Just extract ma88_win.zip to a folder, say C:\ProgramFiles\MQSeries\Java, and add the folder C:\ProgramFiles\MQSeries\Java\lib and C:\ProgramFiles\MQSeries\Java\bin to your system’s PATH environment variable. Also add all the jar files in C:\ProgramFiles\MQSeries\Java\lib folder to your system’s CLASSPATH environment variable. You can also run the classpath.cmd batch file provided in C:\mqjms\batch folder which sets the necessary path and CLASSPATH variables. Just modify the MQ_JAVA_INSTALL_PATH variable in the classpath.cmd file to point to your MQSeries JMS installation directory.
Modify the JMSAdmin.config configuration file in C:\ProgramFiles\MQSeries\Java\bin used by MQSeries JMS administration to indicate the context factory and Web address of the JNDI implementation that the application will use. Uncomment the following line:
INITIAL_CONTEXT_FACTORY=com.sun.jndi.fscontext.RefFSContextFactory
and comment out the remaining two INITIAL_CONTEXT_FACTORY variables. Also uncomment the following line:
PROVIDER_URL=file:/C:/JNDI-Directory
and comment out the remaining two PROVIDER_URL variables.
A sample configuration file is provided for reference in the C:\mqjms\batch folder.
Make a directory named JNDI-Directory on the C: drive for storing JNDI objects. Change to the C:\ProgramFiles\MQSeries\Java\bin directory and run the JMSAdmin batch file and you should see the the InitCtx variable.
Type in the following one after the other:
def qcf(MQ_JMS_MANAGER) qmgr(MQJMS.QManager)
press Enter
def q(JMS_RequestQueue) qmgr(MQJMS.QManager) queue(RequestQueue)
press Enter
def q(JMS_ResponseQueue) qmgr(MQJMS.QManager) queue(ResponseQueue)
press Enter
You have now bound the queues to JNDI objects.
Setting up the AXIS framework in WSDK
WSDK comes with a beta version of AXIS. So you just need to setup and deploy the AXIS framework on WSDK. To do this, use the following steps:
- The axis directory contains the required structure for deploying the AXIS framework in WSDK. It contains a web.xml file in the WEB-INF directory which contains a mapping for registering the org.apache.axis.transport.http.AxisServlet servlet. Also copy the required AXIS framework classes from C:\wsdk\lib to the C:\wsdk\services\applications\axis\WEB-INF\lib folder.
- The deployment folder in C:\wsdk\services\applications\axis\deployment directory contains the PriceServiceDeploy.wsdd file, which is the deployment descriptor for deploying your Web service named “PriceService”.
Next, you move on to deploying the AXIS framework. Use the following steps:
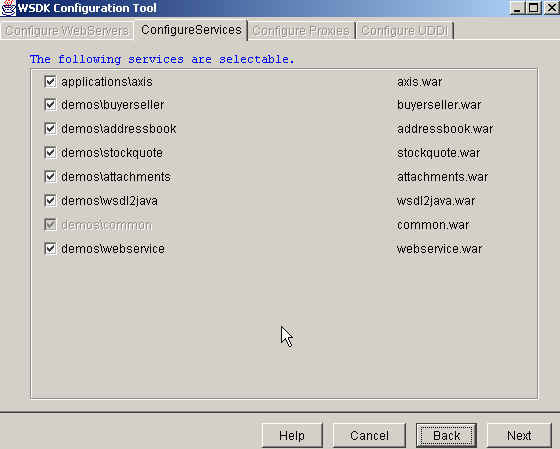
- Open up the windows command prompt, change the directory to C:\wsdk\bin. Set the path variable to include C:\wsdk\bin and C:\wsdk\sdk\bin and run the following command: wsdkconfig. The wsdkconfig tool starts up. Click the Next button to proceed to the configure services section and select the application\axis services as shown in Figure 4. Click Next two times and click Finish finally to deploy the AXIS framework. You should receive the message “The application server has been configured for WSDK”.
Figure 4. Deployment the AXIS Framework on WSDK
Next, let’s move on to deploying your Web service.
Deploying your Price Web service
For deploying your Price Web service, follow these steps:
- Change the directory to C:\mqjms\batch and execute the classpath.cmd batch file to put the required classes in your CLASSPATH environment. Change the directory to C:\mqjms and compile your source files by typing in:
javac naveen\jms\*.java - Start the WebSphere Application server associated with WebSphere Studio Application Developer by navigating to Start -> Programs -> IBM WebSphere SDK for Web Services -> Start App Server.
- Change the directory to C:\wsdk\bin and execute the following command to deploy the Price Web service:
axisDeploy c:\mqjms\naveen\jms\PriceServiceDeploy.wsdd -l http://localhost:80/axis/services/AdminServicewhere C:\mqjms\naveen\jms\PriceServiceDeploy.wsdd is the location of your deployment file and http://localhost:80/axis/services/AdminService is the URL where your AXIS framework is deployed.After executing the above command you should receive the message “- Processing file c:\mqjms\naveen\jms\PriceServiceDeploy.wsdd”
Done processing - Now you need to configure your JMSMqseries Transport on the client side. To do this, execute the following command:
java org.apache.axis.utils.Admin client c:\mqjms\naveen\jms\jmsclient-deploy.wsddThe option client indicates that deployment information is for client side only. You are now done with the deployment of your architecture.
Analyzing the application code
Analyzing the JMSSOAPClient.java file
Start with line numbers 30-44 of your JMSSOAPClient.java file.
Service service = new Service();
Call call = (Call) service.createCall();
call.setTargetEndpointAddress(new java.net.URL(endpointURL));

QName qname= new QName("PriceService", methodName);
call.setOperationName(qname);
call.addParameter("price", XMLType.XSD_STRING, ParameterMode.PARAM_MODE_IN);

call.setTransport(new JMSMqseriesTransport());
call.setReturnType(XMLType.XSD_FLOAT);
|
In Listing 1, you begin by creating an org.apache.axis.client. Call object and then set the location of webservice; call parameters, service, method name and the transport mechanism (JMSMqseries Transport) to it.
Line 51: Float price = (Float) call.invoke(params);.
You then invoke your Price Web service. Since you have defined your own custom Transport mechanism, the AXISClient checks the transport object in the deployment descriptor (client-deploy.wsdd) and loads the transport handler (JMSSOAPSender) deployed for “JMSMqseriesTransport” Transport. So JMSSOAPSender gets invoked and control gets transferred to it.
Now move on to analyze JMSSOAPSender.java.
Analyzing the JMSSOAPSender.java file
Line 24: public class JMSSOAPSender extends BasicHandler.
Your JMSSOAPSender extends the org.apache.axis.handlers.BasicHandler to classify itself as a handler to the AXIS System.
In the constructor, you create a context of the Initial Context factory to look up your Request Queue.
Listing 2. JMSSOAPSender.java

public void invoke(MessageContext msgContext)
// Get a string representation of SOAP Envelope SOAPEnvelope soapEnvelope = axisMsg.getSOAPEnvelope(); Element envElement = soapEnvelope.getAsDOM(); String strSOAPBody = XMLUtils.ElementToString(envElement); |
You then send the SOAP message to the Request Queue by calling sender.send(jmsMsg) at line 91 and then wait until the reply message arrives at the Response Queue at line 96: TextMessage replyMsg = (TextMessage) receiver.receive();
At line 103 you wrap the response in to the org.apache.axis.Message object and set the response object in msgContext by calling the setResponseMessage method so that the response is available to the JMSSOAPclient, as follows:
org.apache.axis.Message responseMsg = new
        org.apache.axis.Message(replyMsg.getText());
msgContext.setResponseMessage(responseMsg);
|
When a message arrives at the Request Queue, the JMSSOAPListener.java onMessage (javax.jms.Message msg) gets executed as it is listening asynchronously on the Request Queue.
Now move on to analyze the JMSSOAPListener.java code.
Analyzing the JMSSOAPListener.java file
At line 79 you create an instance of AxisEngine, MessageContext and associate with the engine as follows:
AxisEngine engine = getAxisEngine(); msgContext = new MessageContext(engine); |
The getAxisEngine() method at line 53 is responsible for creating the AxisServer configuration from the configuration file, located at:
"C:\WSDK\WebSphere\installedApps\wsdk.ear\axis.war\WEB-INF\server-config.wsdd".
Lines 101-107 get the response from MessageContext and convert it to a string representation using helper methods as discussed in Analyzing the JMSSOAPSender file.
At line 119 you send a response to the Response Queue by calling:
sender.send(jmsResponseMsg);
This results in the execution of JMSSOAPSender, which was suspended as it was waiting for a message to arrive at the Response Queue.
JMSSOAPSender receives the message and transfers the response back to JMSSOAPclient which displays it at the console.
Next let’s move on to see your code in action.
For running the application, execute this sequence of steps:
- Start your JMSSOAPListener by changing to the directory C:\mqjms and typing in:
java naveen.jms.JMSSOAPListenerYou should receive the message “JMSSOAPListener ready to receive messages”. - Next, open a new command window and change the directory to C:\mqjms\batch and run the classpath.cmd variable to initialize the CLASSPATH variable. Then run the JMSSOAPClient by typing in following command:
java naveen.jms.JMSSOAPClient.You should receive the following output snippet messages:
JMSSOAP Sender called
JMS-SOAP Request: < SOAP-ENV ….>
Sending JMS-SOAP Request to Request Queue
Sent JMS-SOAP Request to Response Queue
Waiting to Receive JMS-SOAP Response from Response Queue
Received JMS-SOAP Response from Response Queue
JMS-SOAP Response:
<SOAP-ENV:Envelope … >
End of JMSSOAPSender
The Price is $1500.5Your JMSSOAPClient has successfully used JMS as the transport medium for sending and receiving SOAP messages. - At the JMSSOAPListener console you should see the onMessage() event gets fired when a new SOAP request arrives at the Request Queue. The JMSSOAPListener creates an instance of AXISServer and passes the SOAP request to it and than receives the response back and places it on the Response Queue. You should receive the following output message at the console:
onMessage event Executed
<SOAP-ENV ….>
Getting response message from Price WebService
<SOAP-ENV ….>
Sending JMS-SOAP Response to the Response Queue
Waiting for Next JMS-SOAP Requests
You have successfully used the JMS protocol for communicating with your SOAP requests. This architecture can be applied for synchronous as well as asynchronous processing of SOAP messages.
This article of mine was first published by IBM developerWorks. All rights reserved by IBM and author.
