This article describes how Mobile Application Builder (MAB) can be used to build wireless applications and, together with IBM DB2 Everyplace, deliver enterprise data into wireless devices. It can also be used to access and perform updates to this data.
The purpose of this article is to help you:
- Understand and use the features of DB2 Everyplace
- Configure and install DB2 Everyplace
- Build, deploy, and test a sample Palm application
Overview of DB2 Everyplace
DB2 Everyplace is a relational database designed for personal digital assistants (PDAs), handheld personal computers, mobile phones, and embedded devices. DB2 Everyplace is part of IBM’s solution for mobile computing. With DB2 Everyplace, mobile professionals, such as sales people, can access vital data that they need even when they are on the road.
The DB2 Everyplace solution consists of the following components:
- The database: A relational database system designed with a small footprint for small devices.
- The Sync server: A bidirectional synchronization server that moves data between the DB2 Everyplace database and enterprise databases.
- Mobile Application Builder: A rapid application development tool for creating DB2 Everyplace applications that can run on mobile devices.
The database engine
This relational database engine delivers persistent storage for record sets and provides the ability to modify and retrieve records using SQL. Data in a DB2 Everyplace database can be accessed using several different methods:
- Using the Command Line Processor (CLP) to issue SQL statements.
- Using an application that uses ODBC or JDBC as a call-level interface.
Synchronization server
Sync Server is a client/server program that manages the data synchronization process from the mobile DB2 Everyplace database to the source database. Sync Server enables two-way data synchronization from the mobile database to a source database, as well as from the source database to the mobile database. The source database can be any relational database.
Mobile Application Builder
The Mobile Application Builder (MAB) is an integrated toolkit for developing DB2 Everyplace applications running on mobile devices. MAB makes it easy to write robust applications on a more powerful development platform (MAB is supported on Windows NT®, Service Pack 4 or higher, Windows 2000®, and Windows XP Professional®) for deployment to mobile devices. Then these applications can run on Palm OS-based devices (for which C language applications are generated), or any device that supports a JavaTM Virtual Machine (Java language applications are generated).
This article describes how to develop a Palm C language application using MAB to build and test our Palm application. Our application will be developed using Version 8.1 of DB2 Everyplace. In a future article, we will synchronize our application with a relational data store.
Version 8.1 also supports Java, and a future article, Building Wireless Java Applications Using DB2 Everyplace, describes how to build a Java application and deploy it to a mobile device that supports a Java Virtual Machine.
Configuring the environment
This section describes how to install the MAB and the associated tools, all of which are available for download at http://www14.software.ibm.com/webapp/download/search.jsp?go=y&rs=gnutools.
Step 1: Install the Mobile Application Builder
To install MAB, run AppBuilderENU.exe, accept the defaults and the setup will install the MAB to <yourDirectory>\DB2Everyplace\ApplicationBuilder.
Step 2: Set up the build environment for MAB
All of the following tools are used by the MAB and must be installed. The tools only need to be installed once on a particular workstation.
Install Cygwin
Run cygwin-b20.1-full.exe by double-clicking the .exe file from Windows Explorer. The default installation directory is c:\cygnus.
Install GNU PRC- Tools
Follow these steps to install the PRC tools, which contains the cross-compiler and other utilities.
- Double-click prc-tools2.0.exe.
- On the Select Components page of the installation wizard, select the C and C++ Tool Chain component of the PRC-Tools. Optionally, install the tool documentation and sample programs.
- On the Choose Destination Location: PRC Tools page, specify the destination folder, or accept the default directory (c:\Program Files\PRC-Tools).
- On the Choose PalmDev Location page, specify the destination folder for the tool chain documentation and sample programs, or accept the default directory (c:\PalmDev). The installation wizard prompts you to choose a location for these files whether you have chosen to install them or not.
Install the Palm OS SDK
Follow these steps to install the Palm OS SDK, which contains the Palm OS C libraries and header files.
- Go to the Palm OS SDK version 4.0 home page located at http://www.palmos.com/dev/tools/_sdk40license.html and click I Agree to comply with the license information. A Palm 4.0 SDK page is displayed.
- Click Windows in the Palm OS SDK for CodeWarrior and/or PRC-Tools section to download sdk40.zip.
- Extract sdk40.zip to any directory, and run the Palm OS SDK 4.0 executable file.
- On the Select Installation Type page, select PRC Tools 2.0. The installation path is set to the same path you specified when installing PRC-Tools 2.0 above on the Choose PalmDev Location page. The default was c:\PalmDev. A new directory named sdk-4 is created.
Install the PilRC resource compiler
To install the PilRC resource compiler, which is used to create Palm program resources (for instance, text strings used in an application), extract pilrc.zip to <prc-tools installation directory>\h-i586-cygwin32\bin. For example, C:\Program Files\PRC-Tools\H-i586-cygwin32\bin.
Set up the PALM Emulator and ROM images
Follow these steps to install the Palm Emulator and ROM images for the Palm Emulator.
- Download the Palm Emulator from http://www.palmos.com/dev/tech/tools/emulator/. You also need to register for the ROM images for the level of PalmOS used in the devices you are registering applications for.
- Save the zip file to the MAB installation directory. (for example, c:\DB2 Everyplace\ApplicationBuilder\bin), and unzip the file in this directory. The emulator.exe file must be located in the MAB installation directory in order for the user interface to find it when you test an application using the Test toolbar or menu item.
Step 4: Set up the Palm Emulator for testing
- Start the emulator by double-clicking on emulator.exe from c:\DB2 Everyplace\ApplicationBuilder\bin.
- From the popup window, select New to start a new emulator session. In the New Session window as shown in Figure 1, select the location of the ROM file you downloaded from http://www.palmos.com/dev/tech/tools/emulator/. Click OK to see the Palm Emulator.
Figure 1. New Emulator session
- Right-click anywhere on the emulator screen and then click Install Application/Database
- Select Install Other to install the database engine.
- Select the following files:
| C:\DB2EveryPlace\DB2e\Clients\PalmOS\DB2eCAT.prc
C:\DB2EveryPlace\DB2e\Clients\PalmOS\DB2eCLI.prc C:\DB2EveryPlace\DB2e\Clients\PalmOS\DB2eComp.prc C:\DB2EveryPlace\DB2e\Clients\PalmOS\DB2eRunTime.prc C:\DB2EveryPlace\DB2e\Clients\PalmOS\Samples\SampleCLP\DB2eCLP.prc |
Setting environment properties
By default, the MAB builder automatically links the Palm prerequisite tools. Because we have already installed the development tools using their separate installation programs using the default file system path recommended, we now must tell MAB where the tools are installed. To do this, go to File -> Preferences -> Palm Tools and click Browse to find the location in which the tools are installed, as shown in Figure 2.
Figure 2. Telling MAB where the tools are installed
Now we are done setting up the MAB development environment.
Building, deploying, and testing our sample Palm application
Now let’s build a sample address book application and deploy it in our Palm emulator.
- Launch the MAB environment by clicking Start -> Programs -> IBM DB2 Everyplace -> Mobile
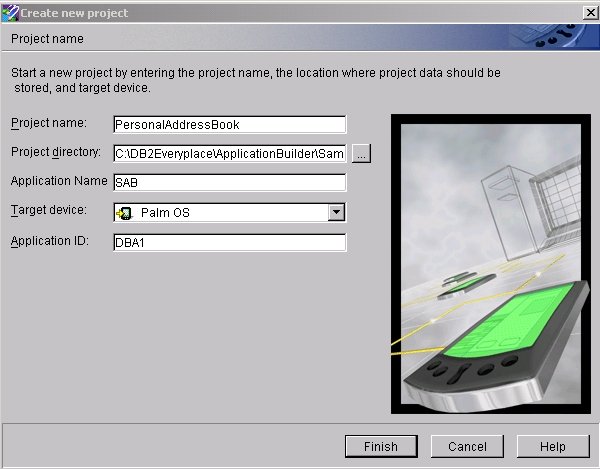
- Select Create a New Project.
- Name the project SampleAddressBook.
- Enter SAB as the application name.
- Select Palm OS as the target device.
- Select the default application ID, DBA1. This ID is registered in the application ID database and can be used for testing purposes. You can change the application ID when you are ready to deploy your application.
- Click Finish.
Figure 3. Creating a project for sample address book application
Loading the table definitions for SampleAddressBook
After the project is defined, you can start defining the tables to be used in the application. DB2 Everyplace MAB includes an option to import table definitions into the project file. These definitions can then be used further when creating forms or referencing columns of other tables on a form. To load our address.ddl (from the sample.zip) file:
- Right-click Tables and select Import Table, as shown in Figure 4.
Figure 4. Loading table definitions
- From the Import table definition window, select address.ddl, then click Open. When the tables are loaded, they appear in the table section of the project tree window.
Building the user interface
With the table definitions loaded into the project pane, we are now ready to start creating forms for the application. There are basically two ways to create a form within MAB:
- Create the form manually.
- Use the form creation wizard to automatically generate a form for a table.
We will use the wizard, as follows:
- Right-click on the Address table and select Launch Form Creation Wizard.
- Select all the database columns to be included in the form, as shown in Figure 5.
Figure 5. Form creation wizard
- Click Next, which enables us to choose the database operations that we want to associate with the forms.
- Select all of the available actions as shown in Figure 6, then click Finish.
Figure 6. Setting available database operations
- Now you can find the Address form in the Forms section. Delete Form1, because this is a blank default form.
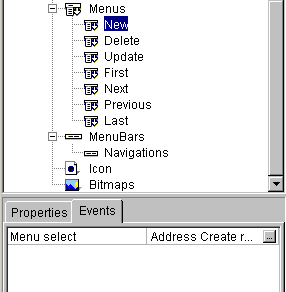
Creating events for the address form
- Select the address form and click New as shown in Figure 7.
Figure 7. Using the address form
- Select the Events tab as shown in Figure 8 and you will see a Tap event and the Address create record associated with the Tap event. A tap event can be compared to a click of a mouse that generates some action. For example, in the above application when you click the New button, the function associated with the New button gets fired. This means that when a user clicks the New button, a new row is created.
Figure 8. Creating a Tap event
- Click Address create record, and the Event Action and Target form appears.
- Click Create Record, select Set Message and select the following notification events (Figure 9):
Figure 9. Selecting notification events
- Create similar events for deleting and updating records.
Building the application
Build the application by selecting Build -> Build from the menu. If the build is successful, you see a message. If you get an error, make sure that you have set up the configuration properly by installing the tools and setting the path in Preferences as we described in Setting environment properties.
When we build our application, many intermediate files are created in order to create the final Palm executable file (*.prc). These files are used by Mobile Application Builder and changing them could result in an error in your project. These are the files:
- *.prc – Palm application executable. This is the final output created when a project is built successfully.
- *.bin – Executable Palm resources in application
- *.c – Source code for application
- sql*.h – Header files your application needs to access the DB2 Everyplace engine functions.
- *.h – Header file used to generate application.
- *.makefile – Used to build executable application for Palm.
- *.rcp – Definition of Palm resources in application.
- ibm_pab-sections.* – Related to multiple code segment support.
Testing the application
Before testing the application, create the sample address book.
- Select Application from the Palm emulator and select DB2e CLP, which is included with DB2 Everyplace.
- Enter the following SQL statement in the Query field as shown in Figure 10 and click Execute.
| CREATE TABLE Address (FirstName Char(30), LastName Char(30) not null primary key ,
Address char(30), Country char(30), PhoneNumber char(15)) |
Figure 10. Create the sample address book
For the address book example, I used LastName as the primary key. In a future article I will talk about data synchronization and we will need a primary key. In your situation, it’s probably better to have a different primary key. Just remember that if you insert a new name, the last name must be different from a previous name or you will get an error.
Loading the sample address book application in our Palm Emulator
- Right click anywhere on the emulator screen and click Install Application.Database.
- Select Install Other to select the path of DB2 Everyplace engine and select the sample address book application file PersonalAddressBook.prc from your projects directory.
- Right-click anywhere on the emulator screen and click Reset -> Soft Reset to accept your changes.
- On the Palm Emulator, click Applications and choose SAB (this is the name gave the application when we created the project.) Our Application appears as shown Figure 11. Then click New.
Figure 11. Adding a new address
- When you click New, you get a notification message as shown in Figure 12.
Figure 12. Confirmation requested
- Click OK and you see a message indicating that the creation was successful.
You can navigate through the application using various control buttons (Tap events) to see the application flow. For example, you can navigate to the first record by clicking the First button. You can navigate through records using Next and Previous buttons and you can delete and update records as well.
Summary
Using DB2 Everyplace, you have successfully created, deployed, and tested a sample application. This application build can now be transferred onto Palm devices.
This article of mine was first published by IBM developerWorks. All rights reserved by IBM and author.

