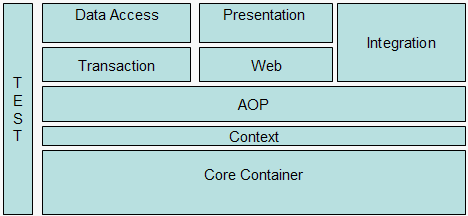
In my previous blog, I provided an architecture overview of the Spring framework. In this blog, I will follow it up with a simple example of using IOC using Spring. The complete source code for the application is available for download here. However, in this blog we would build the code from scratch.
I’ll take the use case of online credit card enrollment that we have discussed earlier in Part 1. With respect to the implementation, the credit card enrollment requires that the user interact with the following services:
- A credit rating service that queries the user’s credit history information
- A remote credit linking service that inserts and links customer information with credit card and bank information for the purpose of automatic debits (if required)
- An e-mail service that e-mails the user about the status of his credit card
For this example, I assume that the services already exist and that it is desirable to integrate them in a loosely coupled manner. The listing 1 below show the application interfaces for the three services.
Listing 1. CreditRatingInterface
public interface CreditRatingInterface {
public boolean getUserCreditHistoryInformation(ICustomer iCustomer);

}
The credit rating interface shown in Listing 1 provides credit history information. It requires a Customer object containing customer information. The implementation is provided by the CreditRating class.
Listing 2. CreditLinkingInterface
public interface CreditLinkingInterface {

public String getUrl();

public void setUrl(String url);

public void linkCreditBankAccount() throws Exception ;

}
The credit linking interface links credit history information with bank information (if required), and inserts credit card information for the user. The credit linking interface is a remote service whose lookup is made through the getUrl() method. The URL is set by the Spring framework’s beans configuration mechanism, which I discuss later. The implementation is provided by the CreditLinking class.
Listing 3. EmailInterface
public interface EmailInterface {

public void sendEmail(ICustomer iCustomer);

public String getFromEmail();

public void setFromEmail(String fromEmail) ;

public String getPassword();

public void setPassword(String password) ;

public String getSmtpHost() ;

public void setSmtpHost(String smtpHost);

public String getUserId() ;

public void setUserId(String userId);
}
The EmailInterface is responsible for sending e-mail to the customer regarding the status of his or her credit card. Mail configuration parameters such as SMPT host, user, and password are set by the previously mentioned beans configuration mechanism. The Email class provides the implementation.
Spring keeps it loose
With all the interfaces in place, the next thing to consider is how to integrate them in a loosely coupled manner. The following Listing 4 provides the implementation of the credit card enrollment use case.
Listing 4. CreateCreditCardAccount
public class CreateCreditCardAccount implements
CreateCreditCardAccountInterface {

public CreditLinkingInterface getCreditLinkingInterface() {
return creditLinkingInterface;
}
public void setCreditLinkingInterface(
CreditLinkingInterface creditLinkingInterface) {
this.creditLinkingInterface = creditLinkingInterface;
}

public CreditRatingInterface getCreditRatingInterface() {
return creditRatingInterface;
}

public void setCreditRatingInterface(
 CreditRatingInterface creditRatingInterface)
{
this.creditRatingInterface = creditRatingInterface;
}

public EmailInterface getEmailInterface() {
return emailInterface;
}

public void setEmailInterface(EmailInterface emailInterface) {
this.emailInterface = emailInterface;
}

//Client will call this method
public void createCreditCardAccount(ICustomer icustomer)
 throws Exception {
 boolean crediRating =
 getCreditRatingInterface().
 getUserCreditHistoryInformation(icustomer);
 icustomer.setCreditRating(crediRating);
 //Good Rating
 if(crediRating){
 getCreditLinkingInterface().linkCreditBankAccount(icustomer);
 }

 getEmailInterface().sendEmail(icustomer);

}
Note that all the setter methods are implemented by Spring configuration beans. All the dependencies (that is, the three interfaces) can be injected by the Spring framework using these beans. The createCreditCardAccount() method will then use the services to carry out the remainder of the implementation.
The following Listing 5 provides the Spring configuration file for our application.
Listing 5. Spring Configuration
<?xml version=”1.0″ encoding=”UTF-8″?>

<beans xmlns=”http://www.springframework.org/schema/beans”

xmlns:xsi=”http://www.w3.org/2001/XMLSchema-instance”

xsi:schemaLocation=”http://www.springframework.org/schema/beans

http://www.springframework.org/schema/beans/spring-beans-3.0.xsd”>

<– standard bean declaration –>

<bean id=”createCreditCard”>

<property name=”creditRatingInterface”>

<– reference bean declaration wired as a property using the ref bean tag –>

<ref bean=”creditRating” />

</property>

<property name=”creditLinkingInterface”>

<ref bean=”creditLinking” />

</property>

<property name=”emailInterface”>

<ref bean=”email” />

</property>

</bean>

<bean id=”creditLinking”>

<property name=”url”>

<value>http://localhost/creditLinkService</value>

</property>

</bean>

<bean id=”creditRating”>

</bean>

<bean id=”email”>

<property name=”smtpHost”>

<value>localhost</value>

</property>

<property name=”fromEmail”>

<value>mycompanyadmin@mycompanyadmin.com</value>

</property>

<property name=”userId”>

<value>myuserid</value>

</property>

<property name=”password”>

<value>mypassword</value>

</property>

</bean>

</beans>
From version 2.0, Spring framework introduced XML Schema support for configuration schema validation. The major advantage of XML Schema support was that it allowed custom namespaces from other modules and frameworks to added in configuration file which simplifies Spring configurations.
To run the example application you must first download the source code project from the resources section. We would be using Maven tool to build and run the sample application. Please download the latest version of Maven from resources section if you don’t have Maven installed on your system.
Next, extract the source code to a folder such as c:\ and a SpringProject folder will be created. You would find the following structure as shown in figure below.
Figure 1. The source code structure

The pom.xml is the maven build file for the project. The following listing provides the pom.xml file. Please look at the in-line comments for explanation of the tags.
<project xmlns=”http://maven.apache.org/POM/4.0.0″ xmlns:xsi=”http://www.w3.org/2001/XMLSchema-instance” xsi:schemaLocation=”http://maven.apache.org/POM/4.0.0 http://maven.apache.org/maven-v4_0_0.xsd”>
<modelVersion>4.0.0</modelVersion>
<groupId>spring-series</groupId>
<artifactId>spring-series-part-one</artifactId> <packaging>jar</packaging>
<version>1.0-SNAPSHOT</version>
<name>spring-series-part-one</name> <url>http://maven.apache.org</url>
<build>
<!–Source Directory –>
<sourceDirectory>src</sourceDirectory>
<resources> <resource>
<directory>src</directory>
<includes>
<include>**/*.properties</include>
<include>**/*.xml</include>
</includes>
</resource>
</resources>
<plugins>
<plugin>
<artifactId>maven-compiler-plugin</artifactId>
<configuration>
<source>1.5</source>
<target>1.5</target>
</configuration>
</plugin>
</plugins>
</build>
<properties>
<!– Set the latest Spring version here –> <spring-version>3.0.2.RELEASE</spring-version>
</properties> <dependencies>
<dependency> <!– Spring core dependency –>
<!– Spring context dependency. The Spring core depedency is –>
<!– pulled by Spring context ,so we don’t need to –>
<!– expliclity include it. Added her only for reference –> <groupId>org.springframework</groupId>
<artifactId>spring-core</artifactId>
<version>${spring-version}</version>
<optional>true</optional>
</dependency>
<dependency>
<groupId>org.springframework</groupId>
<artifactId>spring-context</artifactId>
<version>${spring-version}</version>
</dependency>
</dependencies>
</project>
From version 3.0, Spring introduced module based sources and binaries, so instead of having one spring.jar dependency as in earlier release in pom.xml, you would find relevant module dependency as part of pom.xml. For our example, we require only spring-core and spring-context module.
Open up the command prompt, change the directory to SpringProject, and type in the following at command prompt > mvn clean install.
It will build the source code and put the class files under the target folder. The following figure 2 shows the output generated upon running the mvn clean install command
Figure 2. Build output

You will now execute the Java client program CreateCreditAccountClient by giving the following command on the command prompt window
mvn exec:java -Dexec.mainClass=springexample.client.CreateCreditAccountClient
This will run the CreateCreditAccountClient class, which in turn will create a Customer class object and populate it and also call the CreateCreditCardAccount class to create and link the credit card account. The CreateCreditAccountClient will also load the Spring configuration files through ClassPathXmlApplicationContext. Once the beans are loaded, you can then access them through the getBean() method as shown, finally, in Listing 6.
Listing 6. Loading the Spring configuration file
ClassPathXmlApplicationContext appContext =
new ClassPathXmlApplicationContext(new String[] {
"spring/springexample-creditaccount.xml"
});

CreateCreditCardAccountInterface creditCardAccount =
(CreateCreditCardAccountInterface)
appContext.getBean("createCreditCard");
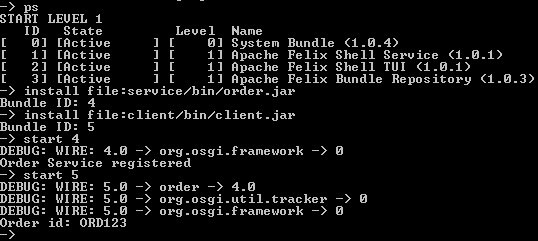
Upon executing this command, the following output as shown in figure 3 below would be displayed. If you look at the INFO: log event highlighted in output below, you would see the beans : createCreditCard, creditRating, creditLinking and email being loaded by the Spring container based on the springexample-creditaccount.xml file.
Figure 3. Project output

In this second article of the Spring Series, we looked at a simple example on how the IOC pattern (as implemented by the Spring IOC container) works and how to inject dependencies, or services, into a working credit card account application rather than having to build them in from the ground up. Stay tuned for more article in the series.
The Spring series articles was originally published in June 2005 by IBM DevelopeWorks. Based on the readers inputs, this article is now updated to latest 3.0.5 release.

