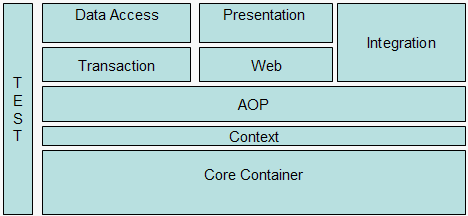
In the previous installment of this series, I introduced the seven modules of the Spring framework, including Spring AOP and the inversion of control (IOC) container. I then used a simple example to show you how the IOC pattern (as implemented by the Spring IOC container) works to integrate disparate systems in a loosely coupled manner.
Now, I pick up where I left off and, with an example similar to the one you encountered last time, demonstrate Spring’s persistence support. Because this banking example incorporates the declarative transaction handling of Spring AOP and the persistence backbone of Spring Hibernate, I’ll start with a closer look at each of these technologies.
Software systems are typically composed of several components, each responsible for a specific area of functionality. Often, however, these components carry additional responsibility beyond their core functionality. System services such as logging, transaction management, and security frequently find their way into components whose core responsibility is something else. The result is sometimes known as code tangling, or more simply, “a mess.” Aspect-oriented programming is a programming technique that seeks to resolve this problem by promoting separation of concerns as a core programming concept.
With AOP, you still define a system’s common functionality in one place, but you can declaratively define how and where to apply this functionality. If you modularize crosscutting concerns, such as logging and transaction management, it becomes possible to add new features to your code without modifying each class individually. Such modularized concerns are known as aspects.
Did you know?
You can use Spring framework functionality in any Javaâ„¢ Enterprise Edition (JEE) server. Also, you can adapt most of it to non-managed environments. A central focus of Spring is to allow for reusable business and data-access objects that are not tied to specific JEE services. You can reuse such objects across JEE environments (Web or Enterprise JavaBeans(EJB)), standalone applications, test environments, and so on, without any hassle.
Take an enterprise application, for example. Such applications often require services such as security and transaction support. Obviously, you could write the support for these services directly into each class requiring it, but you would likely end up rewriting the same transaction-handling code for numerous transactional contexts. If you used Spring AOP for transaction handling you could place the appropriate method calls declaratively, rather than having to place each one individually.
Spring AOP provides several aspects that make it possible to declare transaction policies for JavaBeans. For example, TransactionProxyFactoryBean is a convenience proxy class that can intercept method calls to an existing class and apply a transaction context to a transaction bean. You’ll see this class in action in the upcoming example.
The Spring framework provides integration support for Hibernate, JDO, and iBATIS SQL Maps. Spring’s support for Hibernate is first class, incorporating lots of IOC convenience features and addressing many typical Hibernate integration issues. The framework’s support for Hibernate is in compliance with Spring’s generic transaction and data access object (DAO) exception hierarchies.
Spring provides significant support for using the OR mapping layer of your choice to create data-access applications. Regardless of which technology you choose, much of Spring’s OR mapping support is accessible in a library format, since everything is designed as a set of reusable JavaBeans. OR mapping inside an ApplicationContext or BeanFactory yields the benefits of ease of configuration and deployment.
Hibernate is a full-featured, open source OR mapping framework for the Java platform. Hibernate lets you develop persistent classes following common Java idiom — including association, inheritance, polymorphism, composition, and the Java collections framework. The Hibernate Query Language (HQL), designed as a minimal object-oriented extension to SQL, is an elegant bridge between the object and relational worlds. Hibernate also allows you to express queries using native SQL or Java-based Criteria and Example queries. Hibernate uses XML (*.hbm.xml) files to map Java classes to tables and JavaBeans properties to database tables.
All SQL database management systems are supported through JDBC technology. Hibernate integrates elegantly with all popular JEE application servers and Web containers.
An example banking application will let you see for yourself how well Spring AOP and Hibernate work together. The bank account use case allows a user (Customer) to open one or more bank accounts in a single transaction. The user can apply for multiple bank accounts, choosing from either a checking or savings account type.
An application database (Cloudscape) holds all customer and account information. In this case, assume an association of 1:N between the Customer and Account classes. In a real-life scenario the association might need to be modeled as m:n to allow for joint accounts.
Since users must be able to apply for multiple accounts in a single transaction, you’ll first implement a DOA pattern for database interaction. You’ll then set up Spring AOP’s TransactionProxyFactoryBean to intercept method calls and declaratively apply a transaction context to the DOA.
In the Spring framework, resources such as a JDBC DataSource or a Hibernate SessionFactory can be realized as beans in an application context. Application objects that need to access resources simply receive references to such pre-defined instances through bean references (more on this in the next section). In Listing 1, you can see an excerpt from the example banking application: an XML application context definition that shows how to set up a JDBC DataSource with a Hibernate SessionFactory on top of it.
Listing 1. JDBC DataSource and HibernateSessionFactory wiring
| <!– DataSource Property –> <bean id=”exampleDataSource” > <property name=”driverClassName”> <value>org.apache.derby.jdbc.EmbeddedDriver</value> </property> <property name=”url”> <value>jdbc:derby:springexample;create=true</value> </property> </bean><!– Database Property –> <bean id=”exampleHibernateProperties” > <property name=”properties”> <props> <prop key=”hibernate.hbm2ddl.auto”>update</prop> <prop key=”hibernate.dialect”>net.sf.hibernate.dialect.DerbyDialect</prop> <prop key=”hibernate.query.substitutions”>true ‘T’, false ‘F'</prop> <prop key=”hibernate.show_sql”>false</prop> <prop key=”hibernate.c3p0.minPoolSize”>5</prop> <prop key=”hibernate.c3p0.maxPoolSize”>20</prop> <prop key=”hibernate.c3p0.timeout”>600</prop> <prop key=”hibernate.c3p0.max_statement”>50</prop> <prop key=”hibernate.c3p0.testConnectionOnCheckout”>false</prop> </props> </property> </bean> <!– Hibernate SessionFactory –> </bean> |
Listing 1 shows how to configure a data source bean (exampleDataSource) for the example application database, which is Cloudscape. The exampleDatasource bean is wired to the Spring Hibernate SessionFactory. Note that *.hbm.xml denotes the OR mapping files for the example application.
With the data source and session factory set up, the next step is to wire in the DAO, in this case CustomerDAOImpl, to use the SessionFactory. Next, you insert Spring’s TransactionProxyFactoryBean, which will intercept method calls to the application’s CustomerDAOImpl object and declaratively apply a transaction context to it.
In this example in Listing 2 as shown belo, the addCustomer method of the CustomerDAOImpl class is executed as part of the transaction, with a transaction attribute of PROPAGATION_REQUIRED. This attribute is equivalent to TX_REQUIRED with respect to the EJB container. You use PROPAGATION_REQUIRED if you want the methods to always run in a transaction. If a transaction is already running, the bean method will join in that transaction or the Spring lightweight transaction manager will start one for you. If you want a new transaction to always begin when the component services were called, you would use the PROPAGATION_REQUIRES_NEW attribute.
Listing 2. Wiring together the application DAO and TransactionManager
| <!– Pass the session factory to our CustomerDAO –> <bean id=”customerDAOTarget” > <property name=”sessionFactory”><ref local=”exampleSessionFactory”/> </property> </bean><bean id=”transactionManager” > <property name=”sessionFactory”> <ref bean=”exampleSessionFactory”/> </property> </bean> <bean id=”userDAO” |
And with that the application wiring is done. Now take a closer look at the source code.
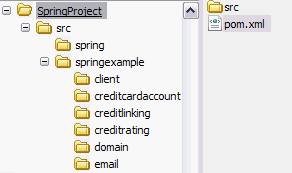
If you haven’t already done so, download the article source. Extract the source zip file to any location on your desktop, say c:\. A folder called SpringProjectPart2 will be created. The src\spring folder contains the Hibernate mapping files and Spring configuration file for the example application. The src\springexample\hibernate file contains the source code for the application.
Here you will find two classes, namely Customer and Account, which are mapped to two tables using Hibernate mapping files. The Customer class represents customer information and the Account represents the account information for a customer. As previously mentioned, I modeled the two classes in an 1: N relationship, where one Customer can hold multiple Accounts. Listing 3 shows the Hibernate mapping file for a Customer object.
Listing 3. Hibernate mapping file for Customer object
| <?xml version=”1.0″?>
<!DOCTYPE hibernate-mapping PUBLIC <hibernate-mapping> <id <set name =”accounts” </set> <property /> <property /> <property /> <property /> <property /> </class> </hibernate-mapping> |
set name=”accounts” and the one-to-many class tag denote the association between the Customer and Account. I have defined a mapping for the Account object in the Account.hbm.xml file.
CustomerDAOImpl.java represents the application DAO, which inserts customer and account information in the application database. CustomerDAOImpl extends Spring’s HibernateDaoSupport, which simplifies session management using the Spring HibernateTemplate. Thus, you can save or retrieve data through the getHibernateTemplate() method. The getCustomerAccountInfo() shown below does a find of Customer and its account information using HQL through getHibernateTemplate().find method, as shown in Listing 4.
Listing 4. DAO implementation
public class CustomerDAOImpl extends HibernateDaoSupport
implements CustomerDAO{
public void addCustomer(Customer customer) {
getHibernateTemplate().save(customer);
// TODO Auto-generated method stub
}
public Customer getCustomerAccountInfo(Customer customer) {
Customer cust = null;
List list = getHibernateTemplate().find(“from Customer customer ” +
“where customer.userId = ?” ,
customer.getUserId(),Hibernate.STRING);
if(list.size() > 0){
cust = (Customer) list.get(0);
}
return cust;
}
All of this should be fairly easy to grasp. Now let’s see the code in action!
Run the applicationTo run the example application you must first download the Spring framework and all its dependency files. Next, extract the framework to, say, c:\ and a folder such as C:\spring-framework-1.2-rc2 (for the current release version) will be created. You must also download and extract Apache Ant and Cloudscape before continuing. After downloading Cloudscape, extract it to c:\ , for instance, and a folder such as C:\Cloudscape_10.0 will be created.Next, extract the source code to a folder such as c:\ and a SpringProject2 folder will be created. Next modify the build.xml file entry, replacing C:\spring-framework-1.2-rc2 with the location where you installed Spring and C:\Program Files\IBM\Cloudscape_10.0 with the location where you installed Cloudscape.Open up the command prompt, change the directory to SpringProject, and type in the following at command prompt: build.This will build and run the CreateBankCustomerClient class, which in turn will create a Customer class object, populate it with some data, create an Account object, populate it, and add it to the Customer object.The CreateBankCustomerClient will then call the CustomerDAOImpl.addCustomer class to add the customer and account information. Once inserted, the CreateBankCustomerClient will call the CustomerDAOImpl.getCustomerAccountInfo method to get the customer and account information based on the userid. You will see the userid being printed on your console if CreateBankCustomerClient is successfully executed. You can also query the Cloudscape database to retrieve customer and account information.
In conclusionIn this second article in the fourth-part Spring Series I’ve shown you how to integrate Spring Hibernate and Spring AOP. The result is a sturdy persistence framework that allows you to carry out transactions declaratively.In the next article in this series I’ll introduce the Spring Model-View-Controller (MVC) module and show you how to use it to simplify the creation of Web-based applications.This article of mine was first published by IBM DeveloperWorks.All rights retained by IBM and the author.

